by Bernhard Stoeger, University of Linz, Austria
Table of Contents
- About this Memo
- The Two Flavours of Zoom
- Installing Zoom
- Starting and Ending Zoom
- Joining a Meeting
- The Zoom Main Window
- The Zoom Meeting Window
- Sharing your Screen for Presenting
- Changing your Name in Zoom
- Using the Chat in Zoom Meetings
- How to Join/Leave a Breakout Room
About this Memo
This document is meant to support those who want to use the Zoom teleconferencing system at the ICCHP online conference held in September 2020. Although primarily addressing blind users who typically will work with a screen reader and with the keyboard rather than the mouse, the one or the other passage of the document might be useful for sighted people as well.
Also, this memo addresses people who work on a PC with Windows 10. Windows versions below 10 might work as well, but were not tested by the author. People who prefer to run Zoom on a non-Windows system such as a Mac or a mobile device will probably have little benefit from this document.
The Two Flavors of Zoom
On a Windows PC, Zoom comes in two different versions: A web version and a Windows desktop version, also referred to as a Windows client. While both versions are usable with a screen reader, the Windows client is recommended because it has much better keyboard support than the web version. To be more specific, most buttons in the Windows client do have a keyboard shortcut, while such shortcuts are completely absent in the web version.
For this very reason, this documentation will almost exclusively treat the Windows desktop version.
Installing Zoom
If you first open the Zoom home page – https://zoom.us -, and join a new meeting, you will be offered the Windows desktop version for download and installation. Follow the instructions there, and Zoom will be installed on your system.
Notice that, when you try to join a new meeting on the Zoom web page, you will be prompted to enter a meeting ID. Since, at this very first moment, you probably will not have such an ID at hand, you may cheat by entering an ID consisting of six times the number 1 – this will let you advance to the download link for the Zoom Windows client.
Notice also that you do not need a Zoom account for taking part in ICCHP – but please do not mix up a Zoom account with a Whova account – such an account you definitely will need for the online ICCHP, but, when reading this memo, you most likely already have got a Whova account. Should you have a Zoom account for other reasons than ICCHP, we recommend to use it. So, in this case you might want to log into that Zoom account prior to requesting a download version of the Zoom Windows client.
Starting and ending Zoom
The easiest way to start Zoom is probably entering the phrase “zoom” in the search box of the Windows start menu. The Zoom app is most likely the first match shown in the search, such that you may confirm it by pressing the Enter key, which will then start Zoom.
Once started, Zoom will show its main Window, which will be briefly described in a later section. Should you have a Zoom account into which you were logged in during your last Zoom session, Zoom will remember this, such that your login will be re-established. Should you work without an account, you do not have to worry about accounts at all.
Please bear in mind that, if you close the Zoom main window, you will not terminate your Zoom session – you will find Zoom still present in your system tray as well as in the so-called “Alt-Tab order”. Should you really want to completely terminate Zoom, you need to open the Zoom system tray menu – this will, among other functions, contain an entry to terminate your Zoom session.
Joining a Meeting
This is done by pressing the “Join a Meeting” button within the main window, mentioned above. In order to join a meeting someone scheduled for you, you need the meeting ID or the web link to the meeting. Typically, one of these pieces of information, most of the time the web link, is communicated to you by the person who invited you to the meeting. At ICCHP, you will use the Whova system to get the web links to the meetings you want to attend.
To get the link to a session, search it in the Whova system, which you probably will do through your agenda. Once you opened the session’s web page in Whova, follow the “View live stream” on the page.
This will bring you to the meeting, but, unfortunately, not with the Zoom Windows client, but with the web client, which we discouraged because of its lack of keyboard shortcuts. To join the meeting with the Zoom Windows client, please follow this workaround:
- Once you followed the “View live stream” link of your session, press the F6 key to focus your browser’s address bar. This will automatically select the web address of the live stream, which you can now copy to the clipboard by pressing Control + c.
- Now bring the main window of the Zoom Windows client to the foreground, and press its “Join a Meeting” button.
- You see an edit box asking for the meeting ID or meeting web link. Paste the meeting’s address from the clipboard to that box by pressing Control + v, and press the Enter key – you now successfully joined the session.
This procedure may look to you a little cumbersome for the first few times, but after some practice you will find it easy.
The Zoom Main Window
Remember: This is the very window showing up when you start a Zoom session. Among its various controls, only these three are mentioned here, because they are the most important ones for our purposes.
- Join a Meeting: This lets you take part in a meeting somebody else invited you to.
- Start a new meeting: This lets you actively initiate a meeting – you can do this only with a Zoom account, and you will not need to do it as an ICCHP participant.
- Settings: This will open a dialog where you might configure zoom and adapt it to your personal needs
Notice that also the Settings button needs a Zoom account to be present in the main window. Should you work without an account, you may access the Settings dialog of Zoom through the Zoom system tray menu.
The Zoom Meeting Window
This is most likely that Window which you will use most of the time – within the meeting window, you will control all aspects of your current meeting.
The window appears when you press the 2Join a meeting” button in the main window mentioned below, and when you enter the meeting id or web link you got from the person who invited you to the meeting.
These are the most important controls, with their keyboard shortcuts, you may use in this important window:
- Open list of participants (Alt + u): Will show you the list of people in the meeting. Press Alt + u again to close the list.
- Open the chat area (Alt + h): This will open, and focus, an area on the screen where you may enter a chat with all, or selected, participants of your meeting. You close the chat area by pressing the Escape key.
- Share your screen (Alt + s): This lets you open your screen to other participants of your meeting. This feature is especially important if you want to do a presentation, for example, at ICCHP. When you press Alt + s to share your screen, you will get a dialog to choose whether you want to share the whole screen or only some of its windows, and whether you want to share the computer’s audio as well. Once you are satisfied with your choices, just press the Enter key to start the share. You revoke your share by pressing Alt + s again.
- Invite other people (Alt + i): This lets you create an invitation for someone who is not yet a participant of your meeting.
- Record the meeting (Alt + r): This function will create a recording of your meeting and save it as a video file. However, you must be the host of the meeting to do this.
- Mute the audio (Alt + a): This important function lets you disable your microphone, such that nobody in the meeting will hear what you are saying or what can be heard in your surroundings. You may invoke this function if you are committed to a task apart from the meeting for a short time. You will use the same keyboard shortcut, Alt + a, to re-activate your microphone.
- Start your video (Alt + v): If you call this function, other people in your meeting will see you, provided of course that your camera is properly installed and not concealed. Notice that, for your protection, you always need to call this function before you will be visible in a newly started meeting.
- Leave the meeting (Alt + q): This lets you go out of the meeting room. You will be asked whether you really want to leave, so that an inadvertent press of Alt + q will not throw you out of the session. In addition, should you be the host of the meeting, you will be asked whether only you want to leave, which will appoint somebody else the meeting host, or if you want to end the whole meeting.
Sharing your Screen for Presenting
If you are doing a live presentation at ICCHP, you will have to share your screen with your audience so they can follow your presentation (slides, audio, and video). In order to do so, please follow these steps:
- Join the running meeting corresponding to the sesion you will be presenting at (see above for instructions on how to do so)
- Click on or select the "Share Screen" button at the bottom of the screen (see screenshot below)
- A new window titled "Select a window or an application that you want to share" will pop up.
- You will be given a list of currently open windows/screens on your computer. Choose the one you would like to share in real time with your audience (for example, your PowerPoint presentation window).
- Important! Ensure that the "Optimize Screen Sharing for Video Clip" checkbox is selected.
- Click or select the "Share" button.
- Ready! You may now proceeed to give your talk as usual.
Changing your name in Zoom
Participants at ICCHP are required to display their real names in Zoom meetings. If you need to change your display name, please follow these steps:
- Join a running meeting (see above for instructions on how to do so)
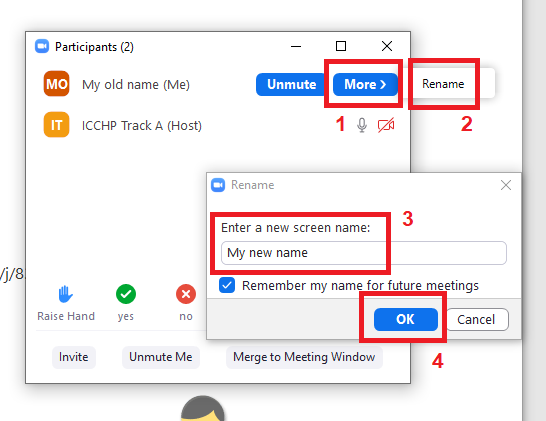
- Open the Participants window by pressing Alt + u or by clicking/selecting the "Participants" button at the bottom of the Zoom Meeting window.
- Hover over your profile row, where your current screen name appears, (or select it using the keyboard) on the Participants window. A "More" button will appear.
- Click the "More" button. A sub-menu will appear.
- Click on the "Rename" menu item (see screenshot below).
- Input your new screen name on the available textfield and press the "OK" button.
- Note that this does not change your profile name, only your screen name for as long as you are attending the current Zoom meeting. Therefore, you will have to repeat these steps for each new meeting you attend.
Using the Chat in Zoom meetings
The chat functionality may be used at any time during a meeting to send a message to all participants, whether publicly broadcasted to all or privately sent to a single person. To use the chat, follow these steps:
- Join a running meeting (see above for instructions on how to do so)
- Press Alt + H or click on the "Chat" button at the bottom of the Zoom meeting window.
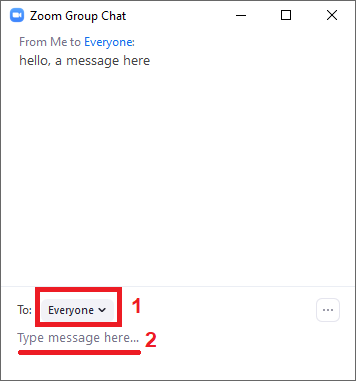
- The Zoom Group Chat window will appear.
- By default, messages will be broadcasted to everyone attending the current meeting. To change the audience of your message, choose the intendent recipient on the available list next to the "To:" label (see screenshot below).
- Write your message on the available textbox by clicking on the "Type message here..." text. You can add new lines to your message by pressing Shift + Return.
- Send your message by pressing the Return key.
How to join/leave a breakout room
During an ongoing session you may be asked to join a breakout room. Breakout rooms allow ICCHP to better organize a session by enabling separate discussion and preparation virtual spaces for participants and authors. You may join a breakout room manually, or a session moderator may redirect you to a specific breakout room automatically
If you are automatically redirected to a breakout room, a pop-up window with the message "Joining Breakout Rooms..." will appear (see screenshow below). Wait a few seconds, and you will land on the breakout room the session moderator chose for you.
You can also join a running breakout room at any time (for example, if you have exited it by accident) by following these steps (see screenshot below):
- Ensure that you have joined a running meeting (see above for instructions on how to do so)
- Click on the "Breakout Rooms" icon on the bottom toolbar of the Zoom meeting window. If no such icon appears, no breakout rooms are available at the moment.
- A new window will appear. Ensure that you have been assigned to the right breakout room e.g. "discussion room" or "presenter preparation room".
- Click on or select the "Join Breakout Room" button. You will be automatically redirected to the breakout room.
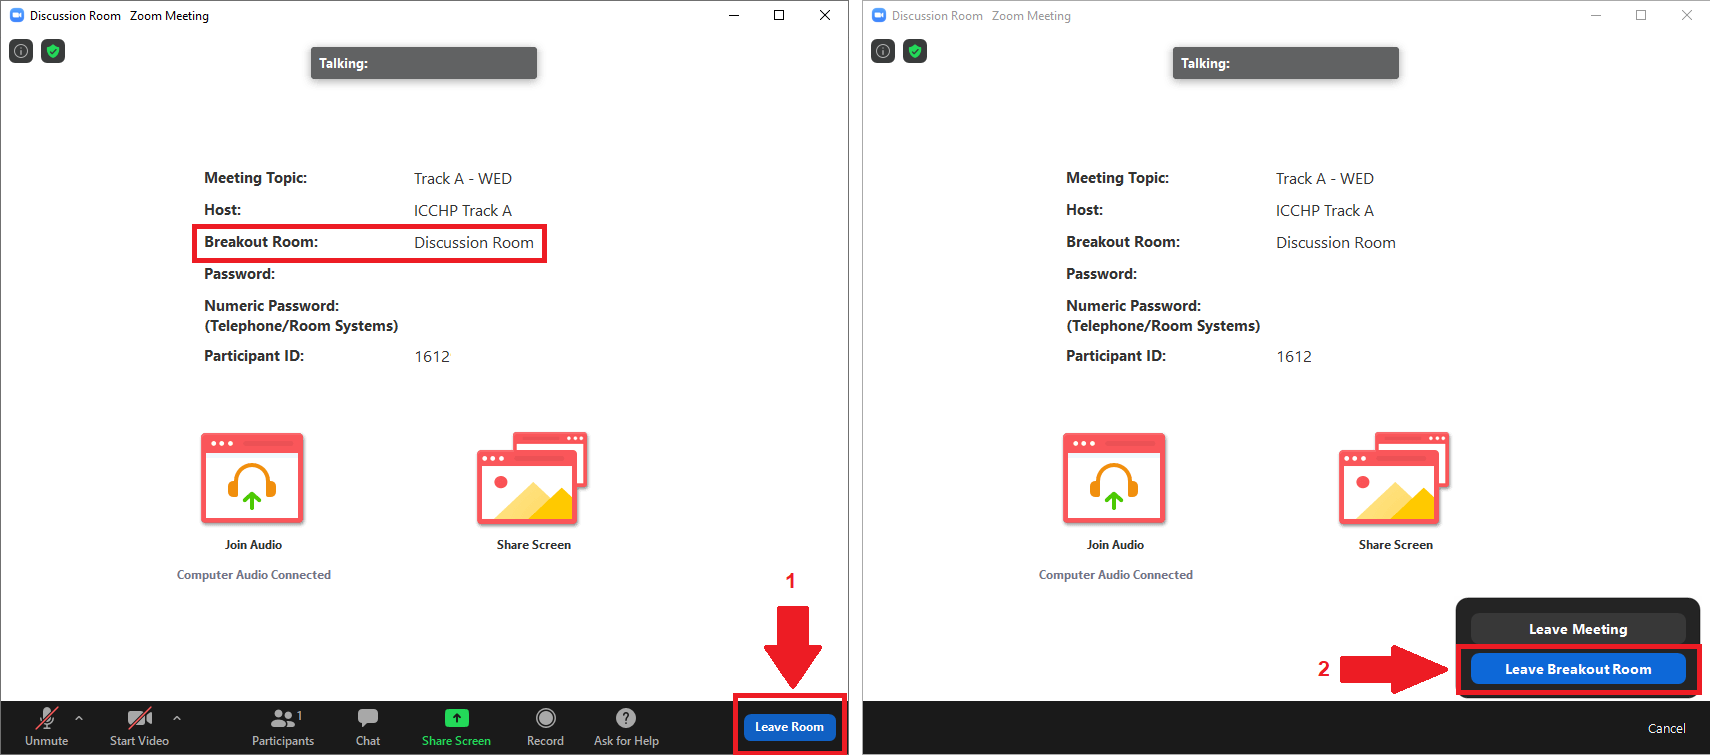
You may at any time leave a breakout room and join the main meeting room again by doing the following (see screenshot below):
- Ensure that you are currently in a breakout room
- Click on or select the "Leave Room" button on the bottom of the meeting window
- A new menu will appear. Choose "Leave Breakout Room". Do not choose "Leave Meeting", as doing so will take you out of the whole session!
- You will be automatically redirected back to the main meeting room in a few seconds.


